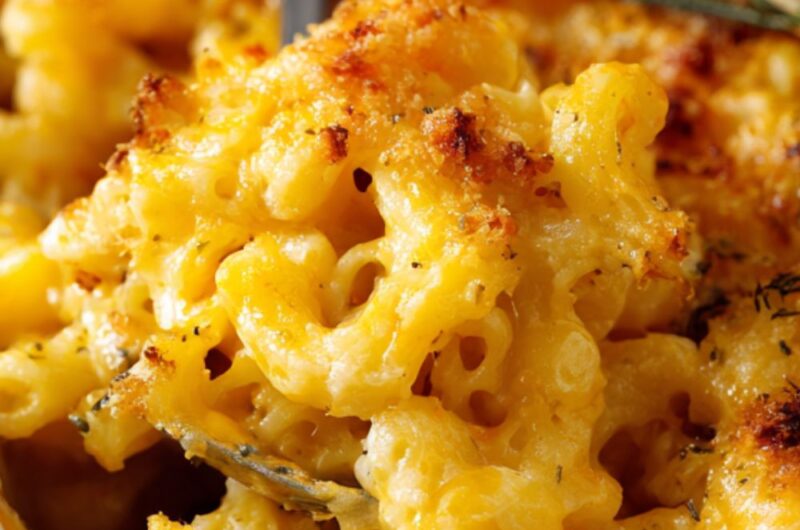
If there is one dish that defines “home” in my kitchen, it’s this Joanna Gaines-inspired Mac and Cheese. This isn’t your average boxed dinner—it’s a decadent, soul-warming masterpiece that feels like a giant hug in a bowl. Inspired by the classic, reliable comfort found in the Magnolia Table cookbook, I’ve perfected this version at home to ensure it’s extra creamy, perfectly cheesy, and has that signature golden crust we all crave.
Whenever I pull this bubbling dish out of the oven, the whole house smells like toasted cheese and nostalgia. It’s my go-to for Sunday dinners, holiday potlucks, or those nights when only a big bowl of carbs and cheese will do.
Jump to Recipe💛 Why This Recipe is a Staple in My Kitchen
- The Ultimate Creaminess: No dry, grainy noodles here. This sauce is silky smooth and stays creamy even after baking.
- A “Grown-Up” Flavor: By using sharp cheddar and a few secret seasonings, it has a depth of flavor that kids love and adults actually enjoy.
- Perfect for Crowds: It’s easy to double, and it’s always the first dish to be scraped clean at any gathering.
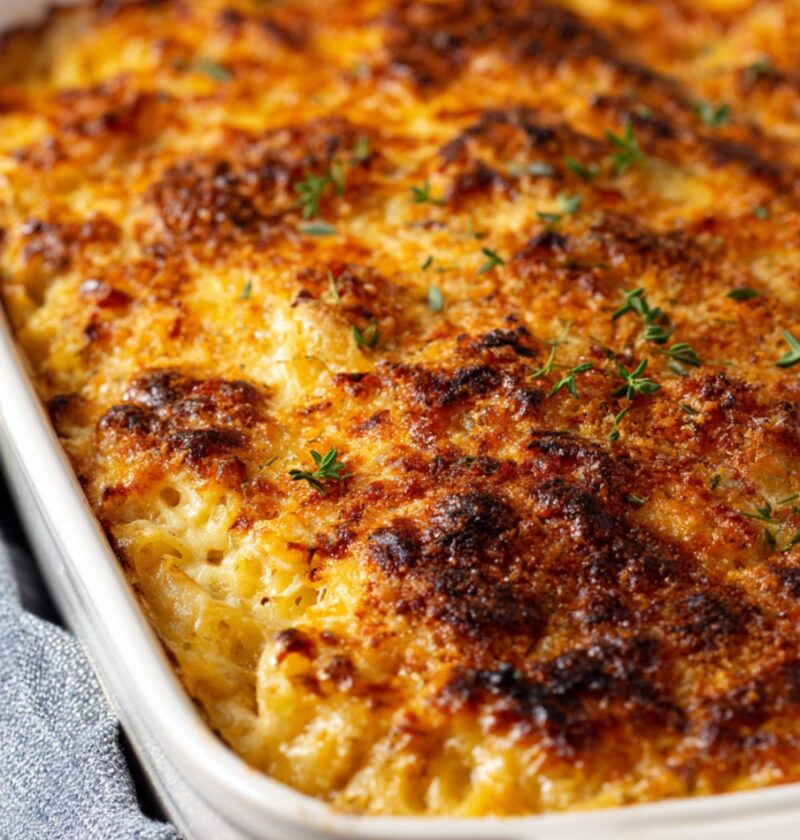
- That Crispy Topping: The contrast between the velvety pasta and the crunchy, buttery topping is what makes this truly special.
🧀 What You’ll Need (Ingredients)
To get that rich, signature Magnolia flavor, here is what I use:
- The Pasta: Large elbow macaroni or cavatappi. I love cavatappi because the ridges hold onto the cheese sauce like a dream.
- The Cheese: I always use a mix of Extra Sharp Cheddar (for the bite) and Gruyère or Monterey Jack (for the melt).
- The Base: Salted butter and all-purpose flour to create a perfect roux.
- The Liquid Gold: Whole milk and a splash of heavy cream. This is a “no-diet” dish, and the high fat content is what prevents the sauce from breaking.
- The Seasonings: Garlic powder, onion powder, a pinch of dry mustard (it makes the cheese taste “cheesier”), and plenty of salt and black pepper.
- The Topping: Panko breadcrumbs tossed with melted butter and a little extra parmesan.

🍲 How I Make It at Home (Step-by-Step)
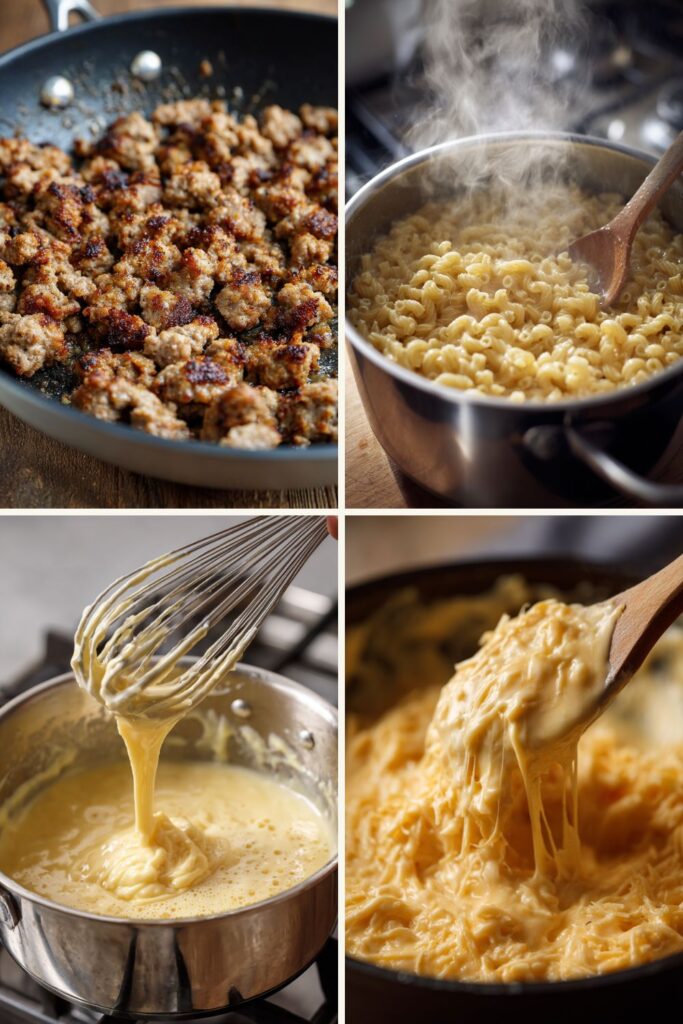
- Prep the Pasta: I boil the noodles in heavily salted water until they are just under-done (al dente). They will finish cooking in the oven, so you don’t want them mushy!
- The Roux: In a large saucepan, I melt the butter and whisk in the flour. I let it cook for about a minute until it’s bubbly and smells slightly nutty—this is the secret to a smooth sauce.
- Whisk in the Cream: I slowly pour in the milk and cream, whisking constantly. I keep it over medium heat until it thickens enough to coat the back of a spoon.
- The Cheese Melt: I take the pan off the heat and stir in the spices and the cheese, a handful at a time. Pro Tip: Don’t dump it all in at once, or it might clump!
- Combine: Toss that beautiful, glossy cheese sauce with your cooked pasta.
- The Final Bake: Pour the mixture into a buttered baking dish. Sprinkle with your buttery breadcrumb mixture and bake at 350 for 20 minutes, or until the top is golden and the edges are bubbling.
🔅 Swaps and Substitutions
- The Cheese: If you don’t have Gruyère, Gouda or White Cheddar work beautifully.
- The Heat: Add a pinch of cayenne pepper or a teaspoon of Dijon mustard if you want a little “zing.”
- The Topping: Out of Panko? Crushed Ritz crackers or even crushed potato chips make an amazing, salty crust.
- Add-ins: I sometimes fold in cooked bacon bits or sautéed jalapeños to give it a modern twist.
🎚 How to Store & Reheat
- To Store: Keep leftovers in an airtight container in the fridge for up to 4 days.
- To Reheat: Mac and cheese can get dry when reheated. I recommend adding a tablespoon of milk to your bowl and heating it in the microwave at 50% power, stirring halfway through. This brings the creaminess back to life!
- Freezing: You can freeze the unbaked mac and cheese for up to 2 months. Just thaw it in the fridge overnight before baking as usual.
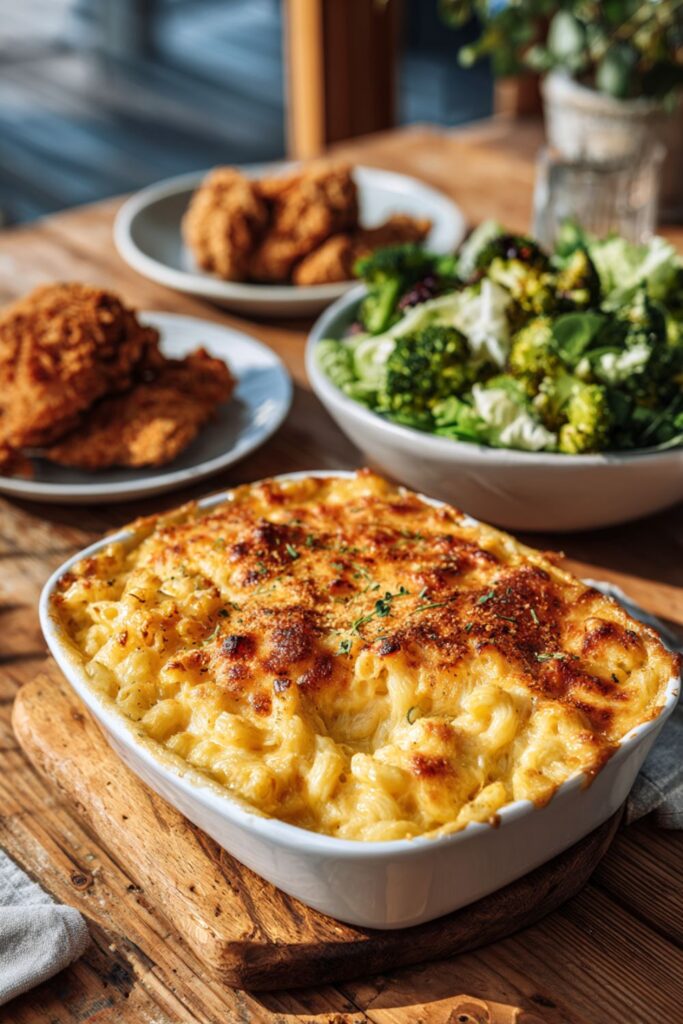
🍗 Serving Suggestions
This dish is a star on its own, but at my house, we love to serve it with:
- Joanna’s Fried Chicken: A match made in Southern heaven.
- A Simple Green Salad: The acidity of a vinaigrette cuts through the richness of the cheese.
- Roasted Broccoli: For those of us who like to pretend we’re being healthy.
🔔 Making Mac and Cheese Ahead of Time
One of the reasons this is my favorite “hosting” dish is that it is incredibly prep-friendly. If I’m planning a big Sunday dinner, I almost always make it ahead of time so I’m not stuck whisking a roux while guests are arriving.
- The Fridge Method (1–2 Days Ahead): Follow the recipe right up until the baking step. Let the mac and cheese cool completely on the counter, then cover the dish tightly with foil and pop it in the fridge.
- Pro Tip: Wait to add the breadcrumb topping until the very last second before you put it in the oven so they don’t get soggy in the fridge.
- To Bake: Take it out of the fridge 30 minutes before baking to take the chill off. You may need to add an extra 10–15 minutes to the baking time since the dish starts cold.
- The Freezer Method (Up to 2 Months): You can freeze the assembled (unbaked) dish. Wrap it in a double layer of plastic wrap and a final layer of heavy-duty foil.
- To Reheat: I recommend thawing it in the fridge overnight before baking. If you bake it from frozen, cover it with foil for the first 30 minutes so the top doesn’t burn while the center is still an ice cube!

🍠 Additional Add-ins & Creative Toppings
If you want to take this from “classic comfort” to “gourmet showstopper,” try mixing and matching these add-ins that I love using at home:
- The Protein Power-Up: Stir in rotisserie chicken, crispy bacon bits, or even browned kielbasa.
- The Veggie Secret: Sautéed spinach, sun-dried tomatoes, or roasted broccoli florets add a nice pop of color and texture.
- Spicy Kick: I sometimes add a small can of diced green chiles or a swirl of Sriracha into the cheese sauce for a subtle heat.
- The “Crunch” Factor: Instead of Panko, try topping the dish with:
- Crushed Ritz crackers mixed with butter (the buttery classic).
- Crushed Cheez-Its (for the ultimate cheese-lover).
- French Fried Onions (like the ones you use on green bean casserole).
🥟 How do you keep macaroni and cheese creamy?
There is nothing worse than a “broken” or dry sauce. To keep your mac and cheese velvety-smooth every single time, I follow these three rules:
- High-Fat Dairy is Your Friend: Now is not the time for skim milk! The fat in whole milk and heavy cream acts as an emulsifier, keeping the cheese from separating into a greasy mess.
- Remove from Heat Before Adding Cheese: This is the #1 mistake people make. If you keep the sauce boiling while you add the cheese, the proteins in the cheese will seize up and turn grainy. Always take the pot off the stove, then stir in your cheese.
- Undercook the Pasta: I always boil my noodles for 2 minutes less than the package says. This ensures they absorb the extra moisture from the sauce in the oven without soaking it all up and leaving the dish dry.
How do you keep macaroni and cheese from clumping?
Clumping usually happens when the cheese doesn’t melt evenly into the base. Here is how I avoid it:
- The “Grate” Rule: I’ll say it again—never use pre-shredded cheese. That cellulose coating they use to keep it from sticking in the bag is exactly what causes clumps in your sauce. Grate it yourself for a seamless melt.
- The Gradual Stir: Don’t dump all 6 cups of cheese in at once. Add it in handfuls, stirring until the first batch is completely melted before adding the next.
- The Perfect Roux: Make sure your flour and butter mixture (the roux) is smooth and bubbly before you add the milk. If the base isn’t well-integrated, the cheese won’t have a stable structure to cling to.
FAQs
Why is my cheese sauce grainy?
This usually happens if the heat is too high or if you use pre-shredded cheese. Pre-shredded cheese is coated in starch that can make the sauce gritty. Always grate your own cheese!
Can I make this on the stovetop only?
Absolutely! Just skip the baking step and serve it straight from the pot. It will be even creamier (more like a diner-style mac).
What is the difference between this and “box” mac?
The biggest difference is the roux base (flour and butter) and the use of real, high-quality fats. It’s much richer and more “real” tasting.
Love this recipe? Try one of these next!
- Pioneer Woman Tortellini Pasta Salad Recipe
- Joanna Gaines Spinach Tortellini Soup
- Pioneer Woman Crock Pot Lasagna Recipe
- Pioneer Woman Ramen Noodle Salad
Nutrition Facts
(Based on a 1-cup serving)
| Nutrient | Amount Per Serving | % Daily Value |
| Calories | 520 kcal | — |
| Total Fat | 32g | 41% |
| Saturated Fat | 18g | 90% |
| Cholesterol | 95mg | 32% |
| Sodium | 680mg | 28% |
| Total Carbs | 38g | 13% |
| Protein | 18g | 36% |
Joanna Gaines Mac And Cheese
Course: Dinner, Lunch, MainCuisine: AmericanDifficulty: Easy6-8
servings15
minutes20
minutes520
kcalIf there is one dish that defines “home” in my kitchen, it’s this Joanna Gaines-inspired Mac and Cheese. This isn’t your average boxed dinner—it’s a decadent, soul-warming masterpiece that feels like a giant hug in a bowl. Inspired by the classic, reliable comfort found in the Magnolia Table cookbook, I’ve perfected this version at home to ensure it’s extra creamy, perfectly cheesy, and has that signature golden crust we all crave.
Ingredients
1 lb Cavatappi or Elbow pasta
½ cup salted butter
¼ cup all-purpose flour
3 cups whole milk
1 cup heavy cream
4 cups sharp cheddar (grated by hand!)
2 cups Gruyère or Monterey Jack (grated)
1 tsp garlic powder
½ tsp dry mustard
Salt and pepper to taste
1 cup Panko breadcrumbs + 2 tbsp melted butter (for topping)
Directions
- Boil: Cook pasta for 2 minutes less than the box directions. Drain.
- Roux: Melt butter in a large pot. Whisk in flour and cook for 1 min.
- Cream: Slowly whisk in milk and cream. Simmer until thickened.
- Cheese: Remove from heat. Stir in spices and cheese until smooth.
- Bake: Fold in pasta. Pour into a 9×13 dish. Top with buttery Panko.
- Finish: Bake at 350 for 20 mins until golden.
Notes
- Grate Your Own: I cannot stress this enough—grating the cheese yourself is the #1 secret to a smooth sauce.
Don’t Overcook: The noodles should have a “bite” to them before they go in the oven.
Let it Rest: Give the dish 5 minutes to sit after baking; this helps the sauce thicken up and “grip” the noodles.